
This guide explains the AtlasKit screen and how to create sprite sheets, split them, and preview animations. Read it from top to bottom to learn the whole workflow.
The screens and shortcuts in this guide are from the Mac version. On Windows, use Ctrl in place of ⌘. Other differences are listed in Differences on Windows.
The screen
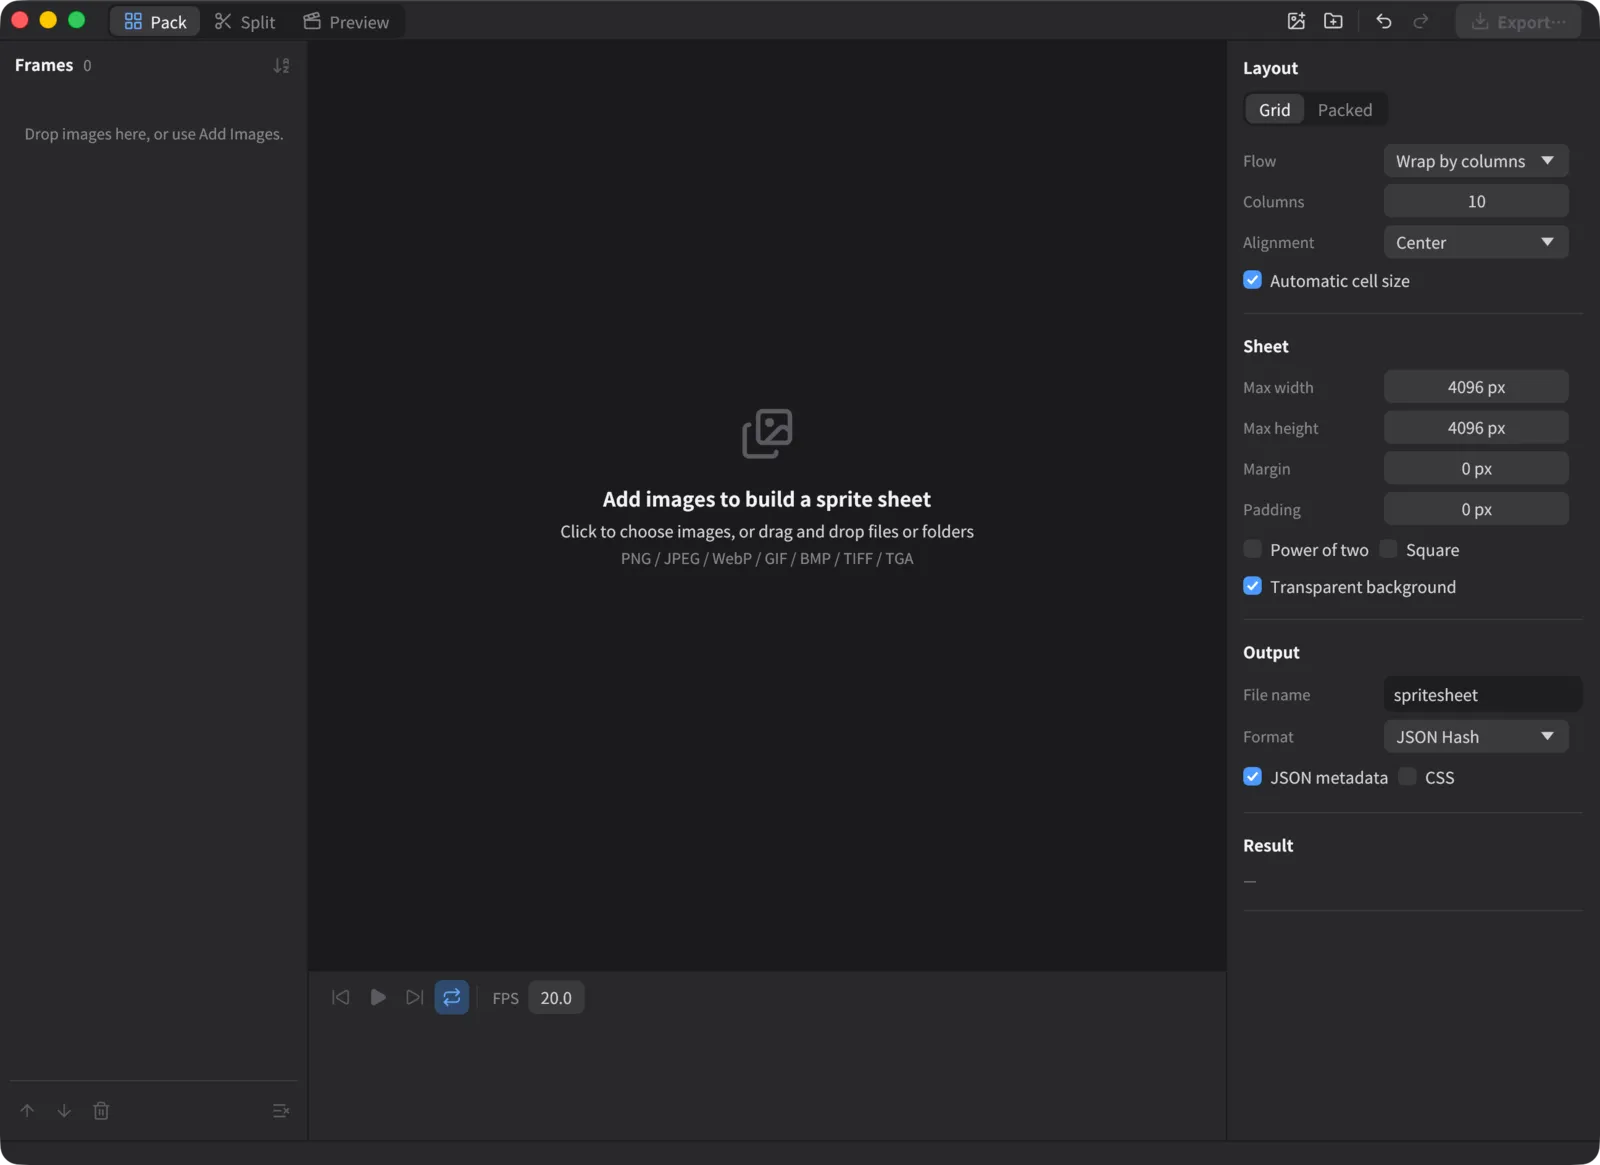
The AtlasKit window has five parts:
- Toolbar (top): Switch modes (Pack / Split / Preview), add images, undo and redo, and export
- Frames (left): The list of imported images, with thumbnails, names, numbers and sizes
- Canvas (center): Shows the sprite sheet, the split area, or the animation
- Inspector (right): Settings such as layout, sheet and output, and the results
- Timeline (bottom): The frame order and playback controls
There are three modes:
| Mode | What it does | Shortcut |
|---|---|---|
| Pack | Combines multiple images into one sprite sheet | ⌘1 |
| Split | Splits one sprite sheet into separate images | ⌘2 |
| Preview | Plays the frames as an animation | ⌘3 |
Pack and Preview share the same frame list, so you can play the frames you arranged in Pack right away in Preview.
Importing images
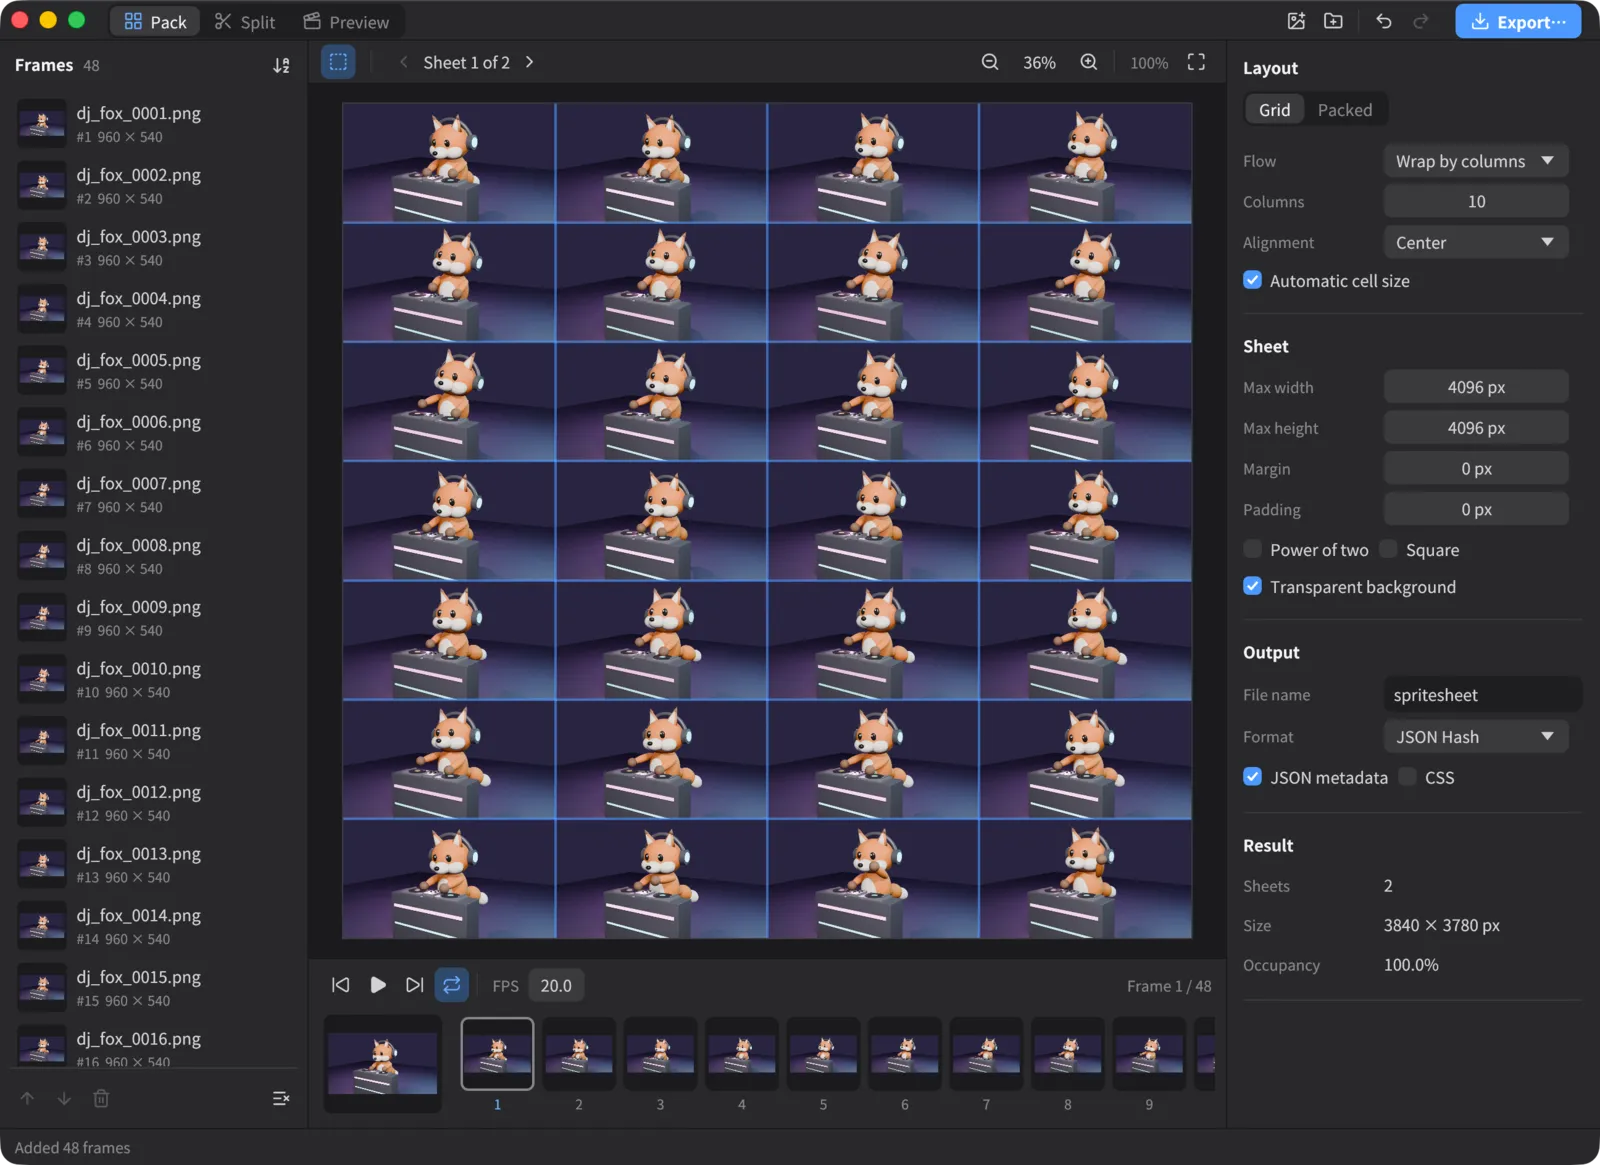
Add images in any of these ways:
- Choose images with the toolbar or File > Add Images… (⌘I)
- Choose a folder with File > Add Folder… (⇧⌘I). All supported images in the folder are imported
- Drag and drop files or folders from the Finder (File Explorer on Windows) onto the window
- Click the empty canvas
Supported formats are PNG (including APNG), JPEG, WebP, GIF, BMP, TIFF and TGA. Animated GIF, APNG and animated WebP files are expanded into one frame per image, named like originalname_0001.
If some files couldn’t be imported, Issues appears at the bottom of the window. Click it to see the reason for each file.
Arranging frames
The order on the sprite sheet follows the order in the frame list.
- Sort: Choose Sort: Natural, Sort: Name or Sort: Reverse from the button at the top right of the list. With natural order, frame2 comes before frame10
- Reorder manually: Drag rows in the list. You can also use Move Up and Move Down
- Select several: ⌘-click to add one at a time, ⇧-click to select a range. ⌘A selects all
- Remove: Select frames and press Delete, or click Remove. Remove All empties the list
You can undo and redo with Edit > Undo (⌘Z) and Redo (⇧⌘Z).
Grid layout (Pack)
Choose Grid under Layout in the Inspector to place frames in cells of the same size. This suits frames of the same size, such as character animations (see the screenshot in Importing images).
- Flow: Horizontal (one row), Vertical (one column), Wrap by columns or Wrap by rows
- Columns / Rows: Where to wrap
- Automatic cell size: When on, the cell size matches the largest frame. When off, you can set Cell width and Cell height
- Alignment: Where to place frames smaller than the cell: Top left, Center or Bottom center. Bottom center is handy for lining up characters’ feet
Packed layout (Pack)
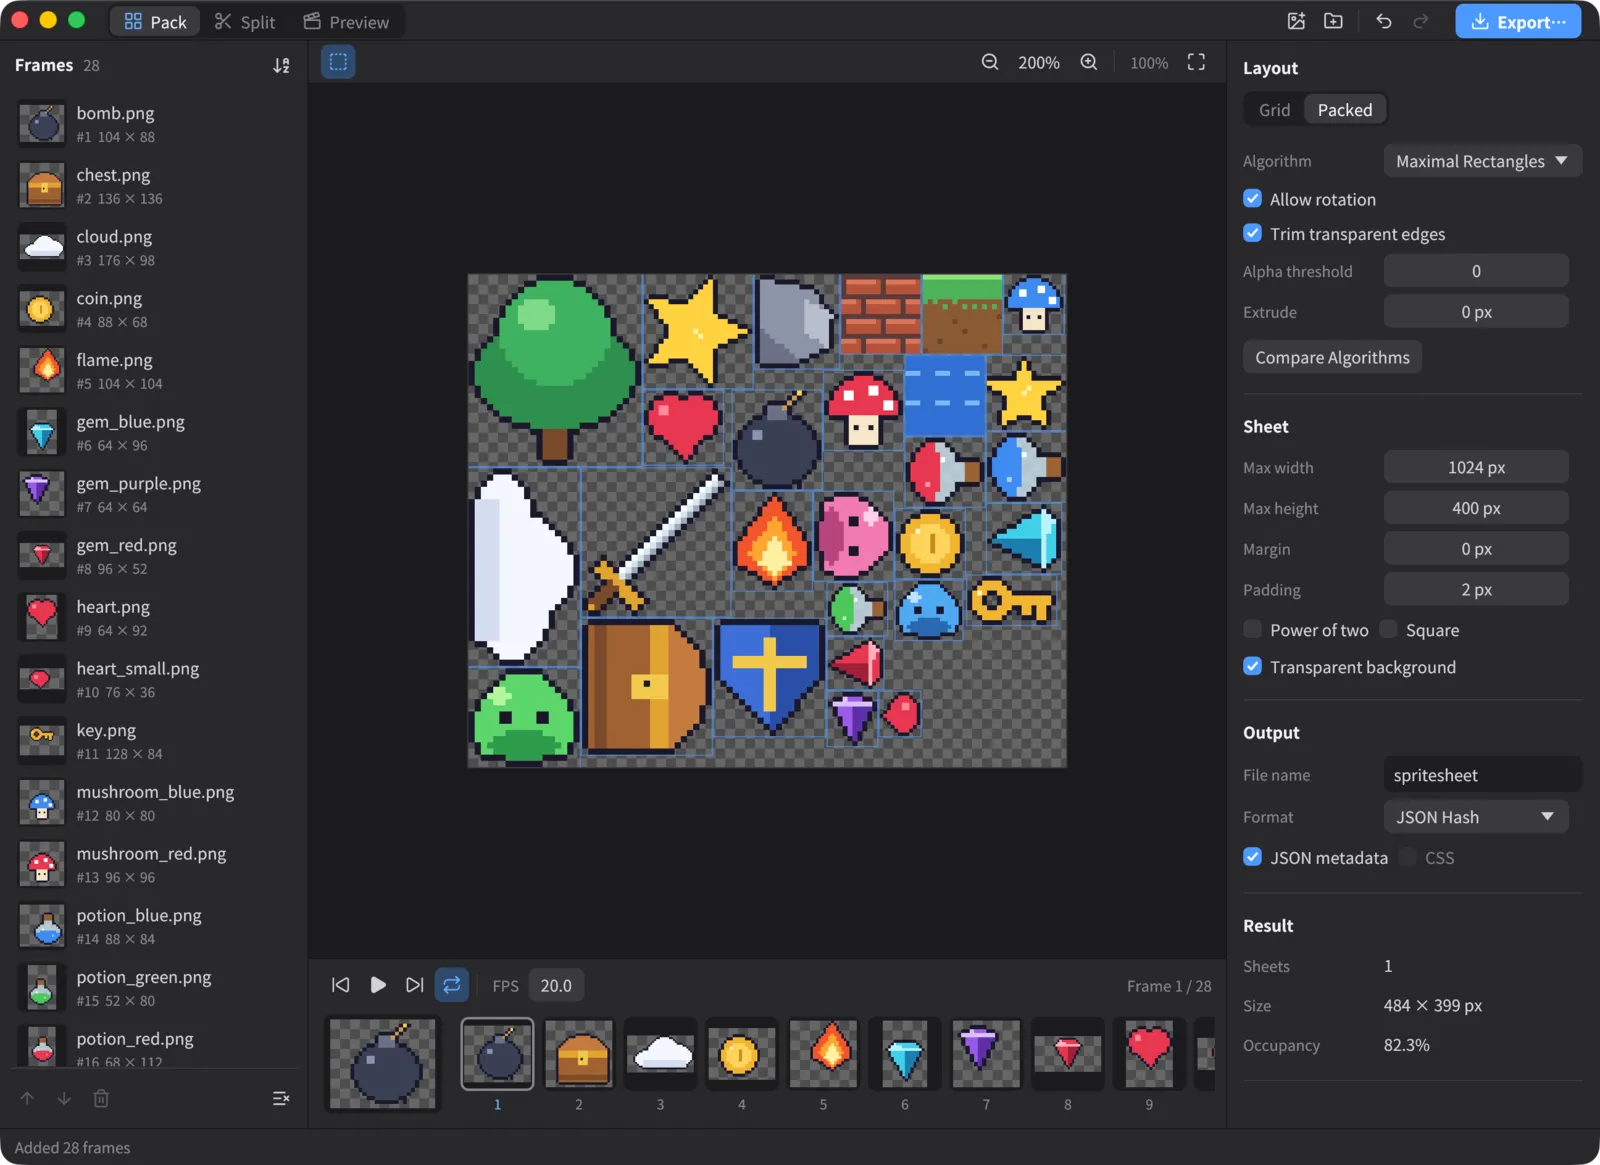
Choose Packed to fit images of different sizes together with as little empty space as possible. This suits assets of mixed sizes, such as items and icons.
- Algorithm: Choose one of 7 packing methods (Shelf Packing, Next Fit, First Fit, First Fit Decreasing, Best Fit, Skyline, Maximal Rectangles). If you’re not sure, try Maximal Rectangles or Skyline
- Allow rotation: Rotates sprites 90° clockwise when that reduces empty space. Available with Skyline and Maximal Rectangles
- Trim transparent edges: Removes the transparent area around each image before placing it. The original size and position are recorded in the JSON, so the sprite can be shown in its original position in your game
- Alpha threshold: When trimming, pixels with this alpha (0–254) or less count as transparent. Raise it to remove faint leftover shadows and the like. The image pixels themselves are not changed
- Extrude: Repeats each sprite’s edge pixels outward by the given width. This keeps colors from neighboring sprites from bleeding in when your game scales the sprites
Rotation, trimming and extrusion are available only in the packed layout. The canvas shows the sheet exactly as it will be exported.
Comparing algorithms
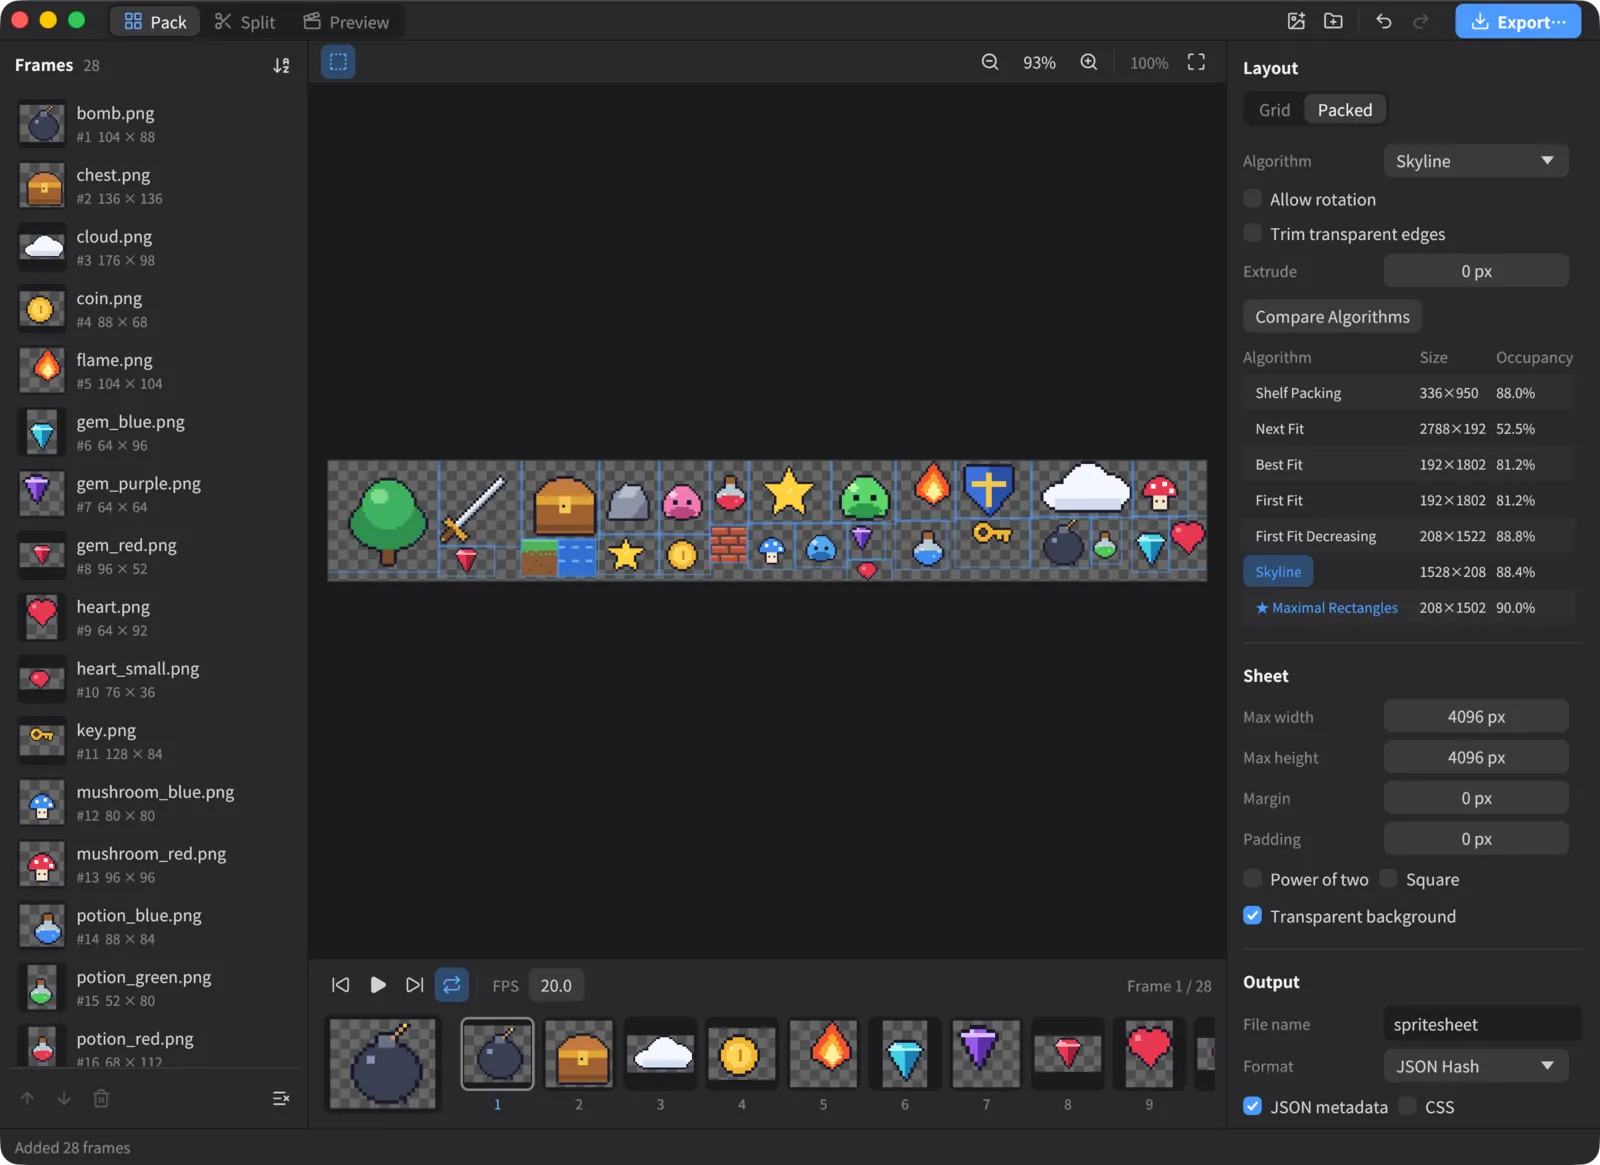
Click Compare Algorithms to try every algorithm with the current images and settings and list the sheet size and occupancy of each. The one with the highest occupancy is marked with ★. Click a row to switch to that algorithm.
Sheet settings
Under Sheet in the Inspector, set the conditions for the exported sprite sheet.
- Max width / Max height: The maximum size of one sheet (up to 16384 px). Frames that don’t fit go on a second or later sheet
- Margin: Space around the edge of the sheet
- Padding: Space between sprites
- Power of two: Makes the sheet width and height powers of two (256, 512, 1024…). Use it when an older GPU or engine requires it
- Square: Makes the sheet square
- Transparent background: When off, you can set Background
Result shows the number of sheets, the sheet size, and the occupancy (the share of the sheet taken up by sprites). When there are several sheets, switch between them with the arrows at the top of the canvas.
Selecting frames
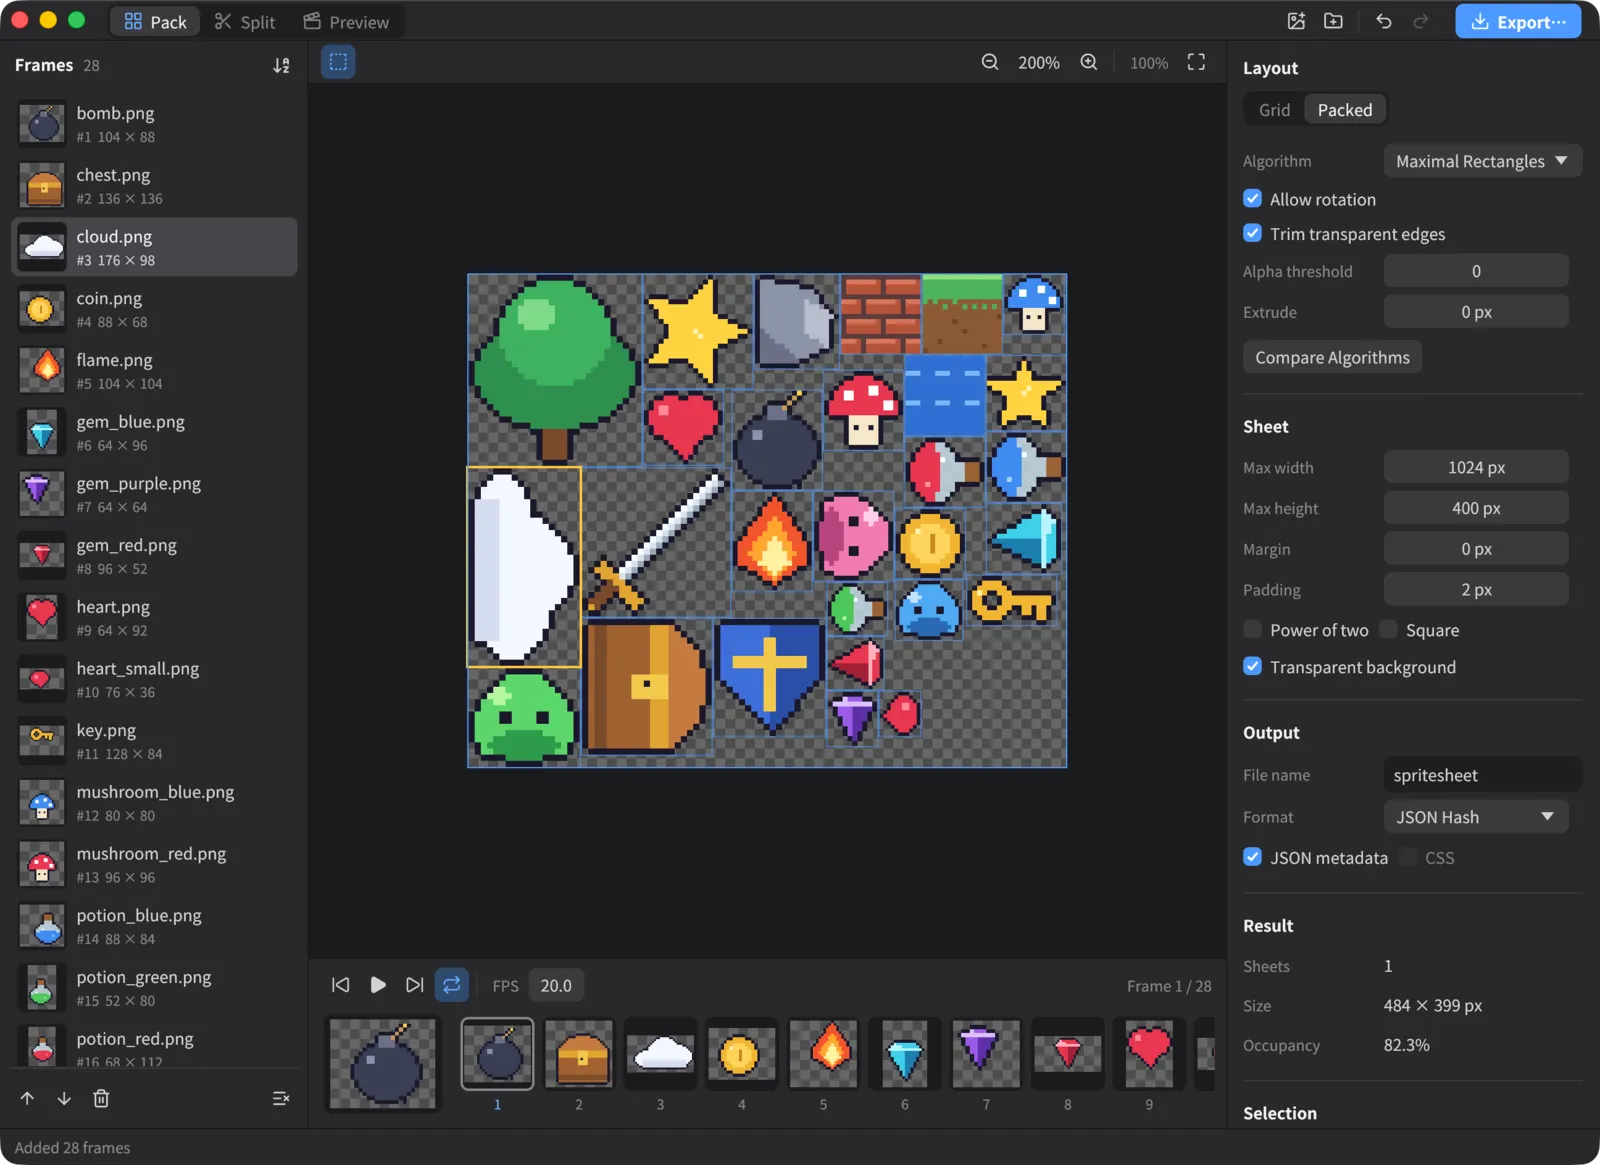
Click a sprite on the canvas or a row in the frame list to select that frame. Selection in the Inspector shows its name, size and sheet position. If the frame is trimmed or rotated, Trimmed size and Rotation are also shown.
Click the canvas and press the arrow keys to move the selection to the neighboring sprite. The Bounds button at the top left of the canvas shows or hides the outline of each sprite.
Zooming
- Zoom in ⌘= / Zoom out ⌘- / Actual size ⌘0 / Zoom to fit ⌘9. The buttons at the top right of the canvas do the same (zooming in and out goes in steps of 2×)
- Pinch on the trackpad, or scroll while holding ⌘, to zoom around the pointer
- Drag or scroll to move around
- Zoom to fit uses whole-number scales such as 2× or 3× when it can zoom in, so pixel art stays crisp
Output settings
Under Output in the Inspector, choose the files to export.
- File name: The name of the exported files, without an extension.
spritesheetcreatesspritesheet.pngandspritesheet.json. With several sheets, the files are namedspritesheet_1.png,spritesheet_2.pngand so on - Format: The JSON format: JSON Hash (an object keyed by frame name) or JSON Array (an array). Choose the one your engine supports
- JSON metadata: Whether to export JSON
- CSS: Exports CSS for use on web pages. Not available while rotation or trimming is on
Exporting
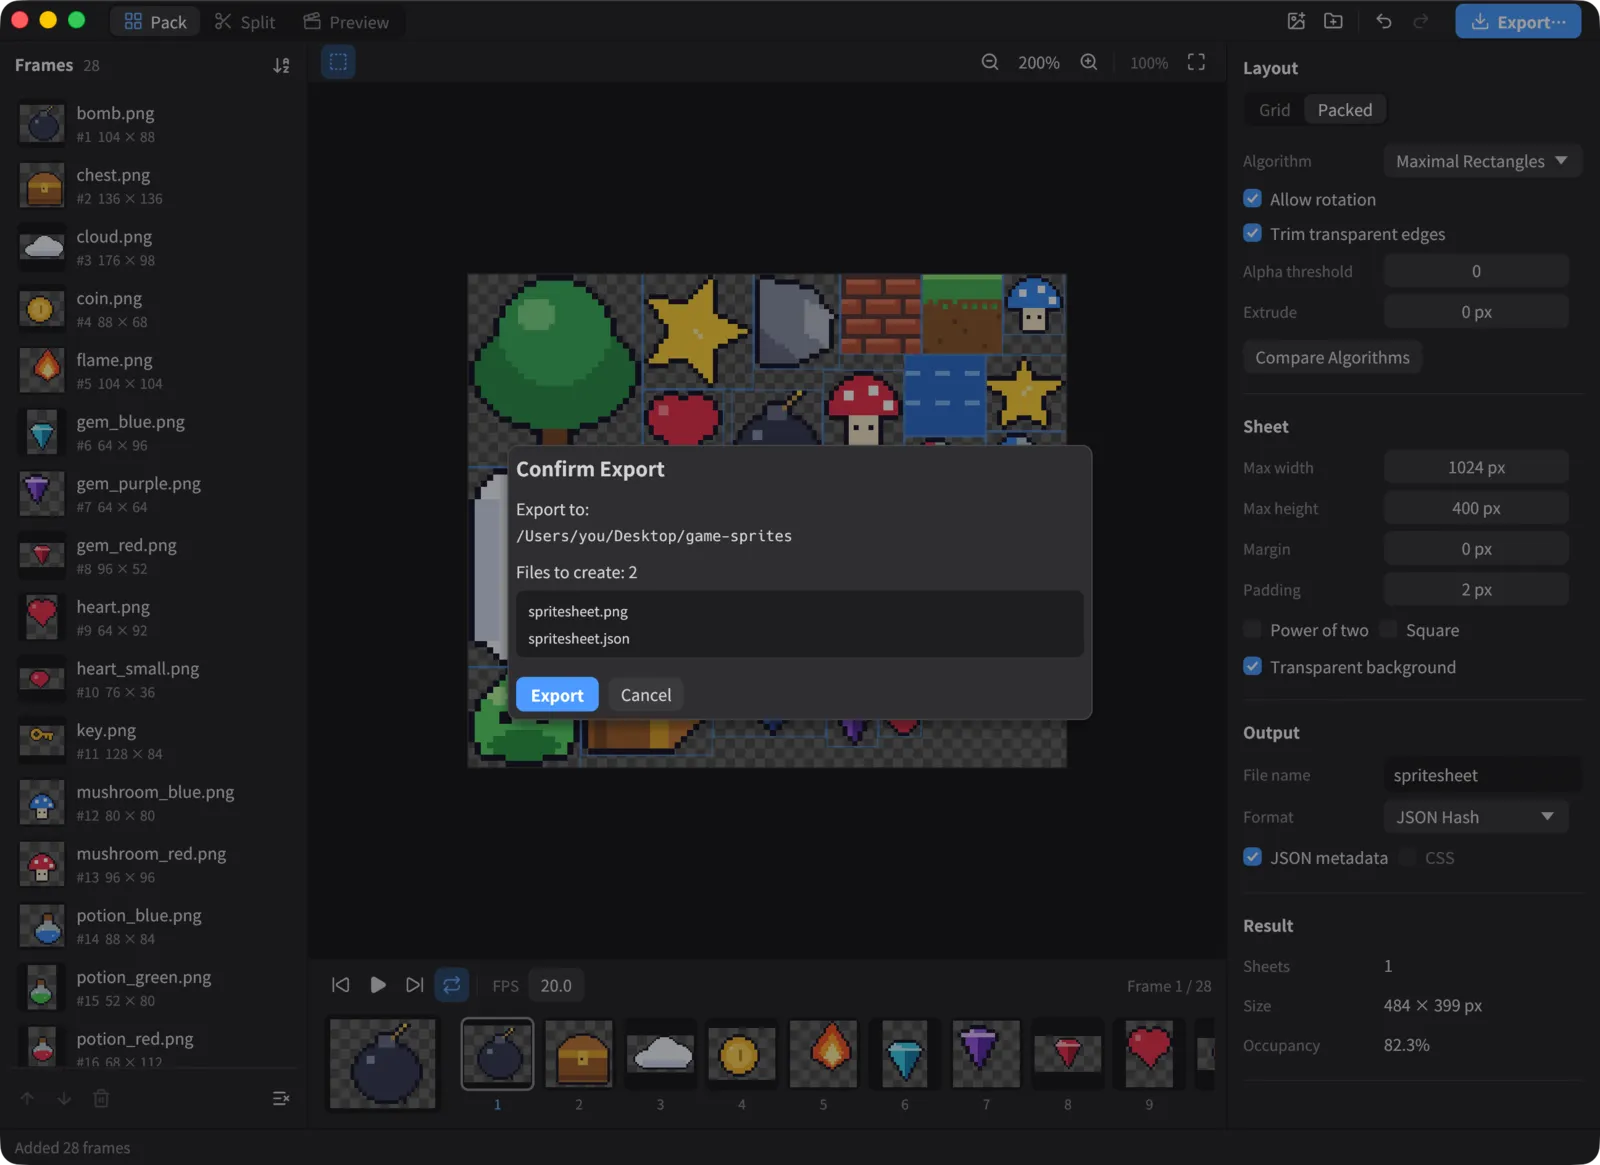
- Click Export… (⌘E) in the toolbar.
- Choose the folder to export to.
- Confirm Export lists the files that will be created. If files with the same names already exist, the files to be overwritten are listed too.
- Click Export to export. When it’s done, click Show in Finder (Show in Explorer on Windows) at the bottom of the window to open the folder.
Your original images are never modified.
Using the exported files
The exported JSON has the same format as TexturePacker’s JSON (Hash) / JSON (Array). An example of JSON Hash:
{
  "frames": {
    "cloud.png": {
      "frame": { "x": 2, "y": 104, "w": 104, "h": 66 },
      "rotated": true,
      "trimmed": true,
      "spriteSourceSize": { "x": 8, "y": 16, "w": 104, "h": 66 },
      "sourceSize": { "w": 176, "h": 98 }
    }
  },
  "meta": {
    "app": "AtlasKit",
    "version": "1.0.0",
    "image": "spritesheet.png",
    "format": "RGBA8888",
    "size": { "w": 484, "h": 399 },
    "scale": "1"
  }
}
The numbers above are only an example. In actual JSON, meta also includes atlaskit, which records the AtlasKit settings.
| Field | Meaning |
|---|---|
Key (filename in JSON Array) |
The frame name. For image files, the file name including the extension; for frames expanded from an animation, a name like walk_0001 |
frame |
Position and size on the sheet. w and h are the size before rotation; a rotated frame takes up an h × w area on the sheet |
rotated |
Whether the frame was rotated 90° clockwise |
trimmed |
Whether transparent edges were removed |
spriteSourceSize |
The position and size of frame within the original image |
sourceSize |
The size of the original image |
duration |
The display time (in milliseconds) of frames expanded from an animation. Other frames don’t have it |
Loading in Phaser 3
// preload
this.load.atlas('items', 'spritesheet.png', 'spritesheet.json');
// create
this.add.image(400, 300, 'items', 'cloud.png');
Loading in PixiJS (v8)
import { Assets, Sprite } from 'pixi.js';

const sheet = await Assets.load('spritesheet.json');
const cloud = new Sprite(sheet.textures['cloud.png']);
With several sheets, a JSON file is exported for each sheet (spritesheet_1.json, spritesheet_2.json…). PixiJS uses meta.related_multi_packs to load the other sheets too. In Phaser, load each JSON as a separate atlas.
Split: splitting sprite sheets
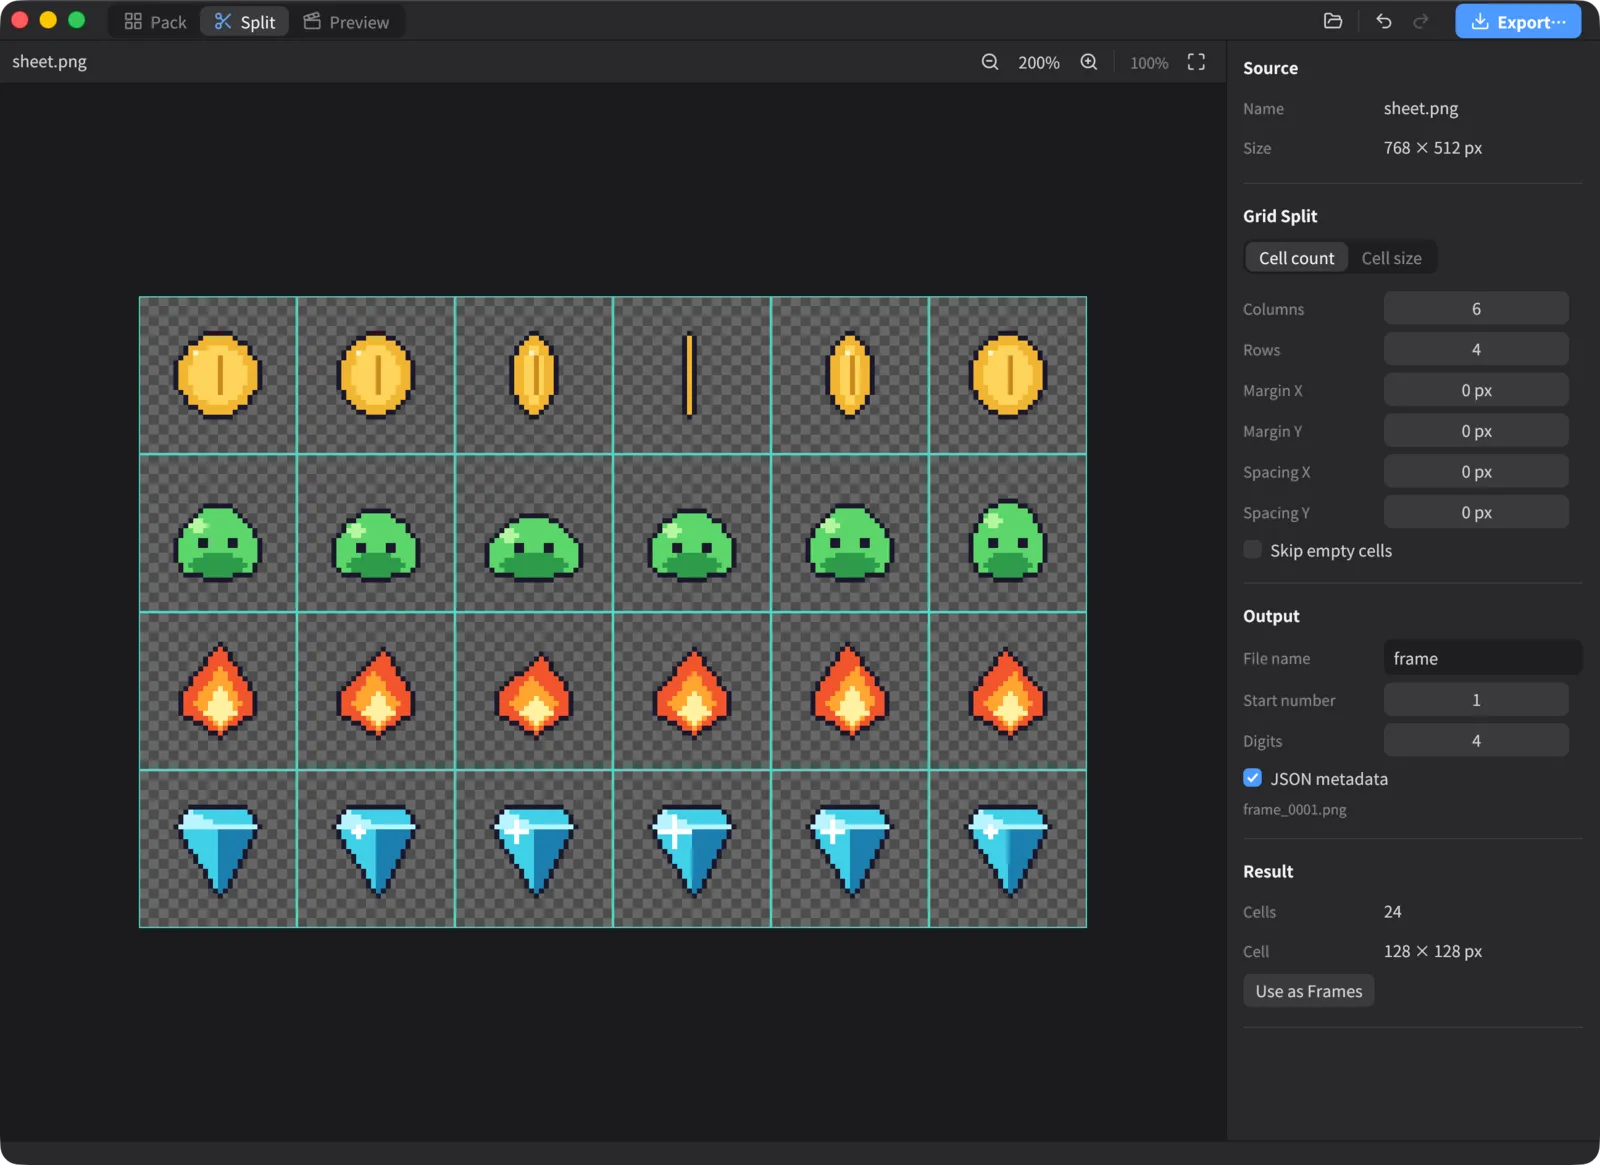
- Switch to Split (⌘2) in the toolbar.
- Open the image to split with File > Open Sheet… (⌘L). You can also drag and drop it onto the canvas, or click the canvas.
- Under Grid Split in the Inspector, choose how to split:
- Cell count: Set how many cells there are across and down
- Cell size: Set the width and height of one cell
- Adjust as needed:
- Margin X / Margin Y: Space from the edge of the image to the first cell
- Spacing X / Spacing Y: Space between cells
- Skip empty cells: Leaves fully transparent cells out of the export
- Check the split on the canvas lines. Result shows the number of cells and the size of one cell.
- Under Output, set the File name, Start number and Digits. With the file name
frame, start number 1 and 4 digits, the files are namedframe_0001.png,frame_0002.pngand so on. Turn on JSON metadata to also exportframe.json, which records each cell’s original position. - Export with Export… (⌘E).
Click Use as Frames to add the split cells to the end of the frame list. For example, you can split an old sheet, rearrange the frames, and rebuild it as a new sheet in Pack.
Preview: checking animations
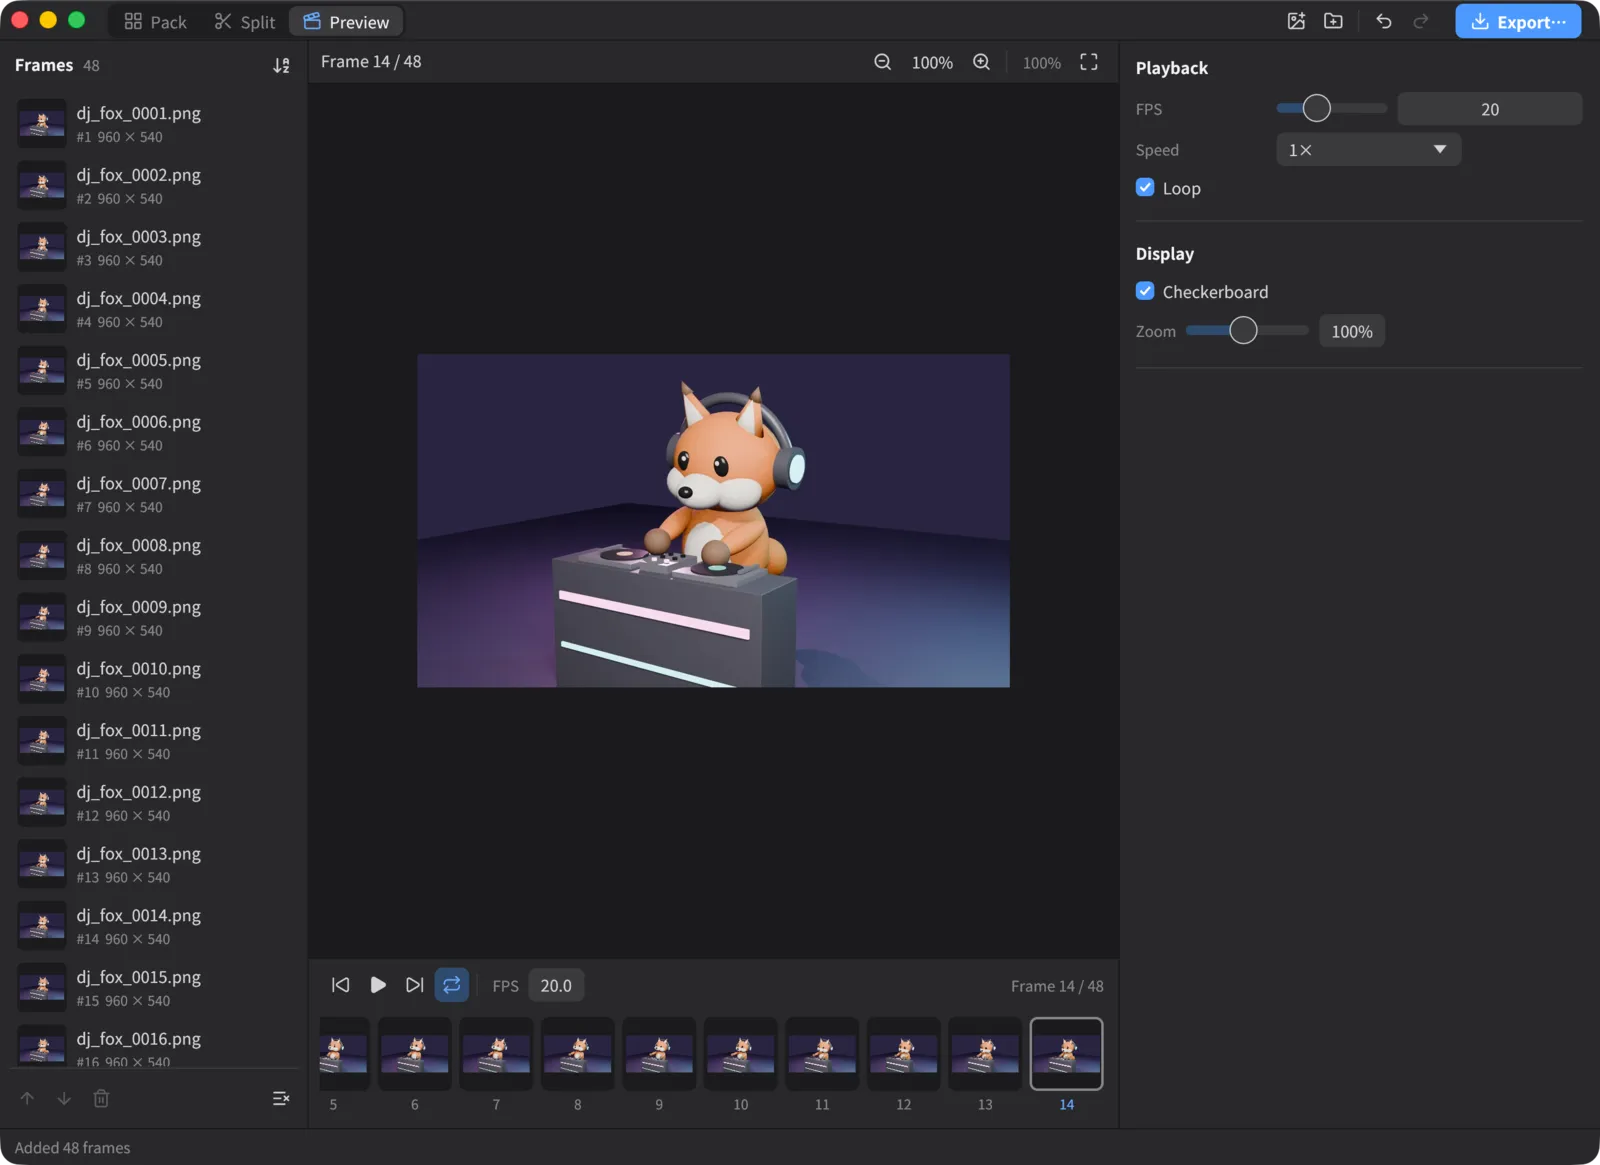
- Switch to Preview (⌘3) in the toolbar. Frames play in the order of the frame list.
- Play and pause with the timeline buttons or the Space key.
- Press ← → to step back or forward one frame. Click a frame in the timeline to jump to it.
In the Inspector, you can set:
- Playback: FPS (1–60), Speed (0.25×, 0.5×, 1×, 1.5×, 2×, 4×) and Loop
- Display: Checkerboard (turn it off to set Background) and Zoom
Playing with the Space key also works in Pack mode. While working in the frame list in Pack, ← → also move between frames.
Saving and opening projects
You can save the imported image order and all settings as a project file (.atlaskit).
- Save: File > Save Project (⌘S). After the first save, it overwrites the same file. To save to a different file, use Save Project As… (⇧⌘S)
- Open: File > Open Project… (⌘O). You can also double-click an
.atlaskitfile in the Finder (File Explorer on Windows) - New: File > New Project (⌘N)
A project doesn’t contain the images themselves; it records where they are. If you moved or renamed the images, opening the project shows “… files could not be found”. Choose Locate Missing Files… and select the folder they are in now, and AtlasKit looks for files with the same names and links them. Choose Open Without Them to open the project without the missing images.
If you have unsaved changes when you quit, close the window, create a new project or open another one, AtlasKit asks whether to save them.
Note that cells added with Use as Frames in Split are saved as their positions on the original sheet.
Differences on Windows
On Windows, some keys and menus follow Windows conventions. The features are the same as on Mac.
| Item | Mac | Windows |
|---|---|---|
| Shortcut keys | ⌘ / ⇧ | Ctrl / Shift (e.g. ⇧⌘I → Ctrl+Shift+I) |
| Redo | ⇧⌘Z | Ctrl+Y |
| Select several | ⌘-click | Ctrl-click |
| Zoom around the pointer | Scroll while holding ⌘ | Scroll while holding Ctrl |
| Display language | AtlasKit > Language | View > Language |
| About AtlasKit, AtlasKit Support | AtlasKit menu, Help menu | Help menu |
| Quit | AtlasKit > Quit AtlasKit (⌘Q) | File > Exit (Alt+F4) |
| Open the exported folder | Show in Finder | Show in Explorer |
Keyboard shortcuts
| Action | Mac | Windows |
|---|---|---|
| New Project | ⌘N | Ctrl+N |
| Open Project… | ⌘O | Ctrl+O |
| Save Project | ⌘S | Ctrl+S |
| Save Project As… | ⇧⌘S | Ctrl+Shift+S |
| Add Images… | ⌘I | Ctrl+I |
| Add Folder… | ⇧⌘I | Ctrl+Shift+I |
| Open Sheet… (Split) | ⌘L | Ctrl+L |
| Export… | ⌘E | Ctrl+E |
| Close Window | ⌘W | Alt+F4 (Exit) |
| Undo / Redo | ⌘Z / ⇧⌘Z | Ctrl+Z / Ctrl+Y |
| Select All | ⌘A | Ctrl+A |
| Pack / Split / Preview | ⌘1 / ⌘2 / ⌘3 | Ctrl+1 / Ctrl+2 / Ctrl+3 |
| Zoom In / Zoom Out | ⌘= / ⌘- | Ctrl+= / Ctrl+- |
| Actual Size / Zoom to Fit | ⌘0 / ⌘9 | Ctrl+0 / Ctrl+9 |
| Play / Pause | Space | Space |
| Previous Frame / Next Frame | ← / → | ← / → |
| Move selection (frame list) | ↑ / ↓ | ↑ / ↓ |
| Move selection (Pack canvas) | ↑ ↓ ← → | ↑ ↓ ← → |
| Remove selected frames | Delete | Delete |
Changing the display language
Use AtlasKit > Language in the menu (View > Language on Windows) to switch between Japanese and English. On first launch, AtlasKit follows your Mac’s language setting.
If you run into trouble, see also the FAQ on the Support page.